If you don’t understand what that title means, chances are you won’t need to use this little trick that I am writing today. But for the curious minds, here’s some clarification:
- PSU: Power Supply Unit
- Mobo: Slang for Motherboard
So, today, I will be talking about a little handy and very popular trick that involves testing your computer’s Power Supply Unit without the Motherboard.
Understand better?
So yesterday my PC decided to tell me that I had to concentrate on my studies yesterday by making a loud, irritating clicking noise. It was so loud it actually woke my roommate up from her nap. Without hesitating I carefully opened my CPU case to detect the source of the clicking. It became very obvious to me that the sound came from the PSU, probably a faulty fan or something. I tilted the CPU a little bit and the sound ceased.
I wanted to make sure that the problem came from my PSU, not from my hard drive (oh no!). But at the same time, I didn’t want to test my PSU with my motherboard, just in case it might damage it too. So how can I get my PSU running WITHOUT my mobo?
By bypassing a simple connection to trick my PSU that it is still connected to the motherboard. It’s called the “Paper Clip Trick”, because all you need, really, is a paper clip. It’s not something I came up with, so don’t give me credit, I just want to share it here for sharing’s sake. Who knows, maybe it’ll come in handy to one of you someday.
So here’s how it’s done.
Disclaimer: I am not responsible if any harm occurs to your hardware or you. Please take appropriate safety measures before you begin.
- This is generally how a complete PC system looks like. That black box at the bottom is the PSU. Trace for the cables that connects the PSU to the motherboard. It’s usually the fattest with the largest connector.
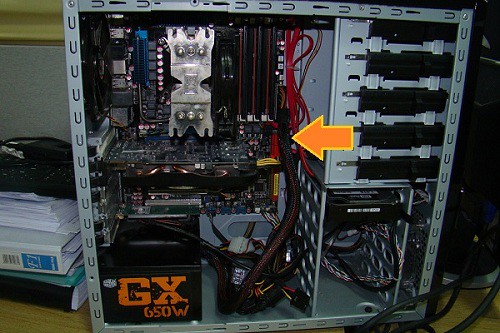
- Here’s a closer look to where it is usually placed:

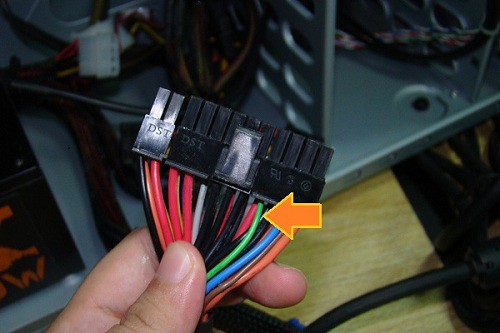
- Make sure the entire CPU is powered down before you start. Then, remove the connection, and you’ll see a bunch of wires connected to its head. Look for the green wire. There’s only ONE green wire, you can’t possibly miss it.
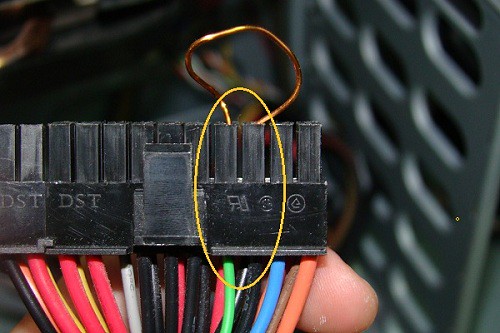
- Now, we will bypass the connection by connecting the green wire and EITHER one of the black wires right next to it. This is where a paper clip comes in handy. Bend it and bypass the connection. In this case I used a copper wire because one of my friends who is a to-be Electrical & Electronics engineer has a lot of them. Yes, the place I’m currently staying is Geek Haven. Connect the wires as shown – you can add insulation for safety purposes.
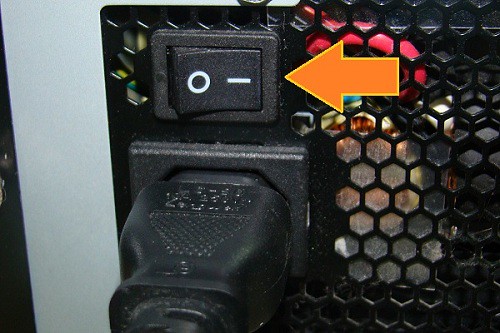
- Then, at the back of the PSU lies the switch to Power On and Off. Turn it On… and the PSU should come to life without having to have a real connection to the mobo. In my case, I managed to confirm that the weird clicking noise was coming from the PSU (not the hard drive, thank God!) which is still under warranty. And that concludes the “Paper Clip Trick”.
Anyway, one of the cons of building your own PC is that you may get accidentally purchase faulty parts. For instance, before my PC was officially born, the motherboard I bought had a dented pin and my hard drive was also wonky and I had to exchange them for good ones. I suppose this could happen to anyone, because hardware life is very unpredictable.
One of the pros, however, is that whenever a problem arises, you know how to diagnose the problem without having to call for external tech support because you know your machine better than anyone else. Yes, I like looking at things from the bright side. I see problems as a way for me to add another solution into my mental manual.
Plus, my ‘uninterrupted’ studying paid off when I managed to leave the examination hall of my last paper with a smile on my face. =)